Windows 7 has a new feature called ReadyBoost that allows to extend system’s memory by using Flash memory or SD Card. This method is quite useful for the Windows 7 Netbook users to increase memory, and definitely it increases system performance.

Note: ReadyBoost will work effectively to speed up your computer when you have 1GB of memory free on on your Flash memory or SD/microSD card.
In following guide you will learn that how to speed up Windows 7 using ReadyBoost.
How to Use ReadyBoost in Windows 7
Step-1
Plugin your Flash memory or SD/microSD card to its appropriate slot on your Windows 7 computer
Step-2
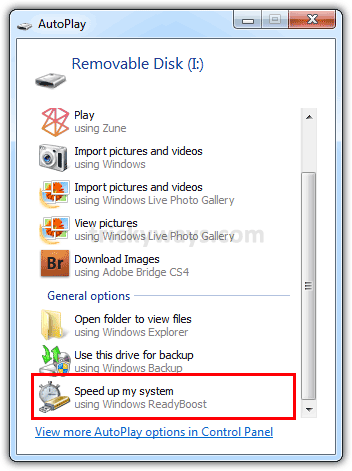
If Autoplay is enabled on your system then it will open “Autoplay window”, so click on the option “Speed up my system using Windows ReadyBoost”. See how to enable autoplay for devices

Step-3
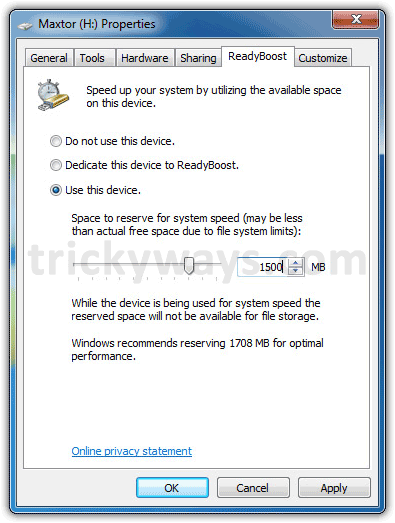
On next screen select the option “Use this device”. It will also recommend space to reserve fro system speed, so this is better to accept the Windows recommended space otherwise you can set it according to your choice by entering the value or using Slider and then click “OK” button

Step-5
ReadyBoost will start configuring cache and after that whenever you will insert card in your computer’s slot, it will automatically use for ReadyBoost
Step-6
Now, open “Computer” and see your Flash memory or SD card is being utalized
Open the Flash memory or SD card and there you’ll find ReadyBoost
We hope you will like this simple method to make your Windows 7 system snappy.
ReadyBoost turning ON / OFF
Very helpful article for Windows 7 users with low memory systems.
nice