Apple OS X Mavericks v10.9 is released as a free download for all users. Its quite normal to upgrade a Mac to OS X Mavericks just by downloading the OS X via App Store. But if you want to make a clean install OS X Mavericks on a Mac hard disk then guide below will help you to do that. Continue reading to know about the OS X Mavericks fresh install.
When you simply upgrade Mac to new OS X Mavericks it will just upgrade the operating system and keep your data, contents and installed programs saved. But if you want to install OS X Mavericks from scratch, that means a fresh install in that case all data, contents and apps will be erased from your hard disk. So its recommended to backup first before proceeding with the fresh / clean install OS X Mavericks process.
To perform OS X Mavericks clean install on system its required to have OS X Mavericks bootable USB flash drive. You can create OS X Mavericks USB by following our guide but remember that you must have a 8GB USB drive to create OS X Mavericks bootable USB.
- Bootable OS X Mavericks USB drive.
- Backup your important data from Mac before going to the next step.
Snapshot of this guide
- First, we will boot Mac from a bootable USB drive that contains OS X Mavericks files.
- To clean install OS X, we will format the Mac drive by using Disk Utility.
- Finally install the OS X Mavericks on that formatted drive.
How to Do a Clean Install of OS X Mavericks
Step-1
Shut down your Mac if its already running, Press the power button and hold down the “Option” / “Alt” key, until a screen with different hard disks partitions appears.

Step-2
Now, attach your OS X Mavericks bootable flash drive to your Mac, USB drive icon will appear select it and click on upward arrow showing under the OS X Mavericks flash drive icon to boot from it.

Format Mac hard disk to perform a clean install
Step-3
Wait for a while and “OS X Utilities” window will appear with several options, here we will use “Disk Utility” to format hard disk for installing a fresh OS X Mavericks, Select the Disk Utility option and click on Continue button

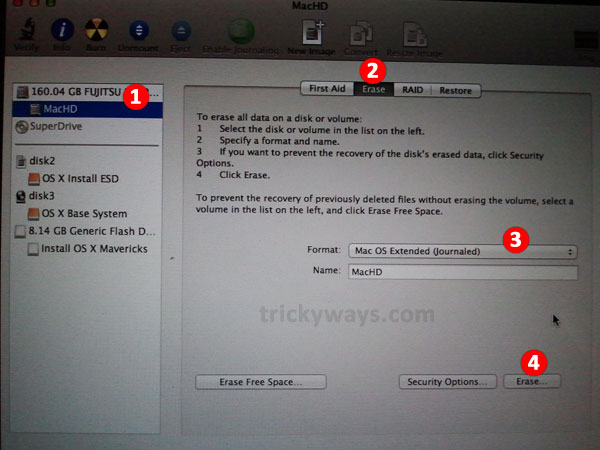
Step-4
On Disk Utility window, select your Mac hard drive from left panel where you want to install OS X, and from right side of screen select “Erase” tab, “Mac OS Extended (Journaled)” from the list, and click on “Erase…” button. Let it complete the process to format your Mac hard disk, in result it will erase whole data from disk.
Clean Install OS X Mavericks
Step-5
Again OS X Utilities screen will appear, and this time you proceed with “Install OS X” option to install a new copy of OS X Mavericks and click on Continue button

Step-6
You will see OS X Mavericks installation wizard click on Continue button.
Accept the Software license agreement, click Agree button.
Select your hard disk that you have formatted in steps above, click Install button

The OS X Mavericks installation will take about 35-50 minutes according to your Mac speed, so be patient.

Register and Setup your Mac
Once installation done, system will reboot. The Welcome screen appears and now you Continue to register and setup OS X Mavericks, select your country or region, choose your keyboard layout, setup Apple ID and iCloud account, create a user login, and so on. After doing all settings your Mac is ready with a OS X Mavericks fresh install.
After installing OS X Mavericks and setting it up on your Mac, you can restore your backup data and apps using Time Machine or you can use your other backup devices to restore your data back to Mac.
Hello!
I have done everything correctly and I am on the step where you can choose “Install OS X” and click on “Continue” but when I click continue after I have erased my SSD correctly nothing happens. I just won’t continue I am trying to install it on an iMac late 2012 model!
Your help is really appreciated as I am stuck there!!