Drivers play a very important role in your computers operating systems stability and performance. If very important to have the latest, correct and compatible drivers to get more output smooth performance in Windows. Most of the user just install the Windows and drivers, that’s it. They never update drivers afterward, so Microsoft has configured settings in Windows 10 to download and update drivers to its latest version automatically via Windows update.
It will automatically download drivers and install in Windows 10, this feature very helpful for users but some of the Windows 10 users don’t want to update driver because of compatibility issue. Just like in my laptop for the AMD Radeon GPU, I have to install a custom modified driver because officially they don’t release new drivers update for Windows 10.
To do that you need to stop Windows update to just skip the drivers part from Windows 10 update and continue to download and install other updates such as security update, Windows 10 core versions update, etc.
There are two ways to stop Windows 10 to update drivers automatically:
- Stop automatically updates drivers via Registry
- Stop drivers update via Group Policy
So, let’s see how to disable auto driver update using both methods on your Windows 10.
You might be interested to learn how to disable Windows 10 update.
Disable drivers update via Registry
- First, you need to open registry editor by pressing Windows key and type regedit.exe or just press Windows+R and then in the Run window type regedit and hit Enter to open it.

- Then navigate to the following key in the registry editor:
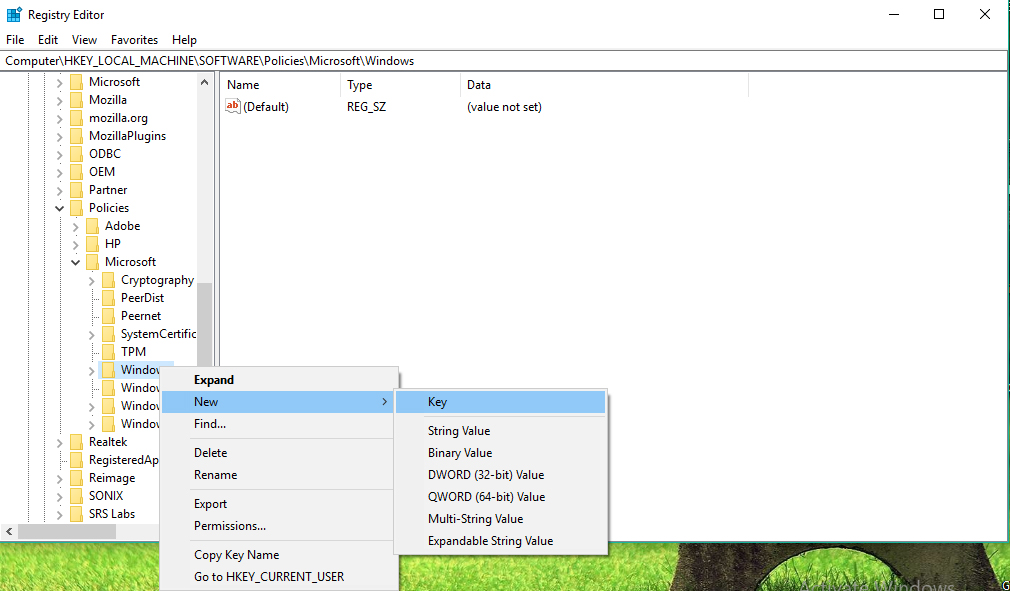
HKEY_LOCAL_MACHINE\SOFTWARE\Policies\Microsoft\Windows - Here you need to create a new key so, right click on the last key named “windows”, click new and select the first option “key”.

- Now name the newly created key to “WindowsUpdate”.
- A new (WindowsUpdate) key will be created in the windows key. Select WindowsUpdate folder on the left side and right click on the empty area on the right side click New and select DWORD (32-bit) value and assign a name
ExcludeWUDriversInQualityUpdate

- The DWORD value that you just created ExcludeWUDriversInQualityUpdate, open it by double clicking on that and change its value 0 to 1. It turns off the automatic drivers update.

Later If you changed your mind and want to reverse and enable it, simply change the value in the last step to 0 and you are done.
Learn also: How to clean install Windows 10
Stop auto install drivers update from Group Policy
If you are using Windows 10 Home edition then this method will not work for you because Group Policy is not part of Windows 10 home edition. You just need to disable it using the first registry method.
- First, open up the Local Group Policy Editor, press the Windows key from keyboard and start typing Gpedit.msc and hit Enter.

- In the GroupPolicy Editor navigate to the following location:
Computer Configuration > Administrative Templates > Windows Components > Windows Update.

- In the right side of Windows update section; look for “Do not include drivers with Windows Update”.

- Open it by double-clicking on it.
- Now check the radio option “Enabled” bad click apply and then ok.


Both above methods are authentic and I have tested on my computer. Which method did you use to stop auto install driver in Windows 10, does this work for you of your need any help? Please leave a comment below.