While installing or uninstalling the new application to your Windows 10 some users might get an error “Fatal error, Installation ended prematurely because of an error” which means this error appears because of something left behind from the last uninstallation which causing the issue.
Whenever you uninstall the app from your Windows, every app leaves some folders or files but if something went wrong while uninstalling the application then you see the error.
How to solve Fatal error Installation ended prematurely because of an error?
This Installation ended prematurely because of an error is not a big deal but if anyone gets stuck to anything then he or she may get frustrated. To solve this error there are some solutions we will talk about them but follow the steps carefully.
Method 1:
Uninstall using third-party tools
There are many tools available on the internet which provides you to uninstall the app which you want completely. These software’s will scans your computers Windows and finds all the files and entries to the related software then remove all the traces. So use third party tools to uninstall the software completely. Here is the list of free uninstaller software:
- IObit Uninstaller
- Wise Program Uninstaller
- GeekUninstaller
- Revo Uninstaller Free
Method 2:
Install the software in Clean Boot
Clean boot state is where Windows only runs the necessary services, no matter whatever you installed will be ignored. So its a very good idea to try to install the application which is giving error while installing in Clean boot state of Windows.
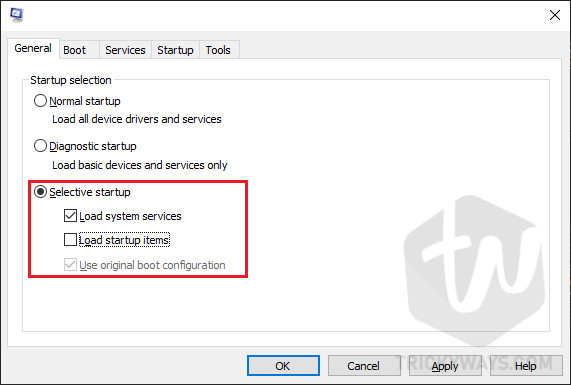
To run your Windows 10 in clean boot press the Win + R key from your computer then type MSConfig and hit enter. In the General tab, check the radio option named Selective start-up and then uncheck Load start-up items.

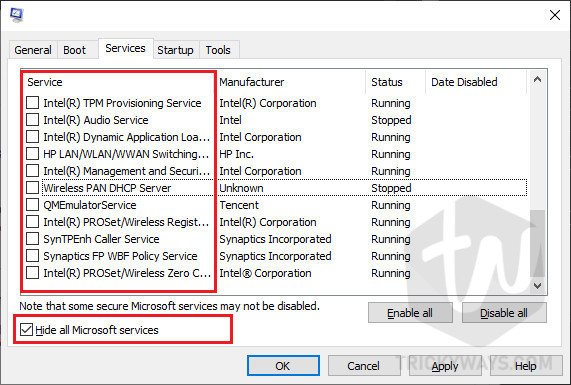
After that, click on Services tab then first check the option Hide all Microsoft services. By doing this it will hide all Windows services and then show all services which are installed by its users like any application services or driver services. Not un-check all the services and click Apply then Ok.

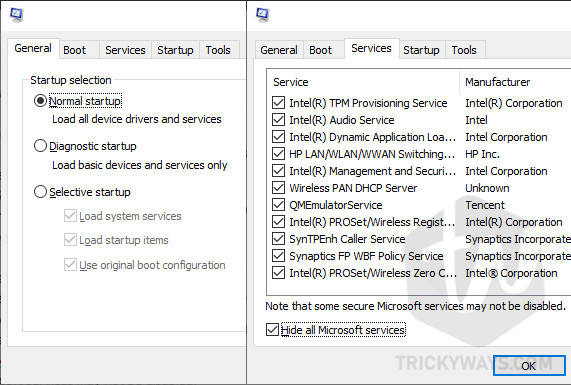
Now restart your computer and this time your computer will boot in Clean Boot State. If you wish to turn everything back to normal then check the Normal startup radio option and check all the user services.

Method 3:
Re-register and Restart Windows Installer Service
Try to re-register and then restart the Windows installer service. To do this, first, open Command prompt or PowerShell with administrator rights. Then type msiexec /unreg and hit enter to un-register Windows installer service. Then again type msiexec /regserver and hit enter to re-register Windows installer service.

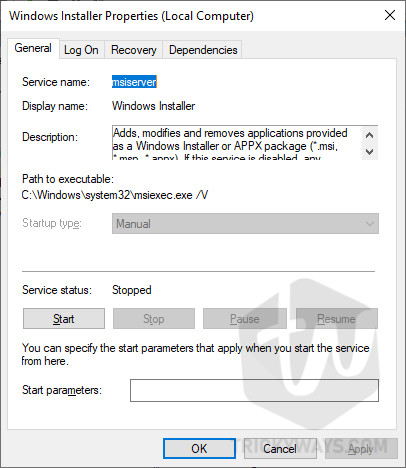
To restart the Windows installer service, press WIN + R key, then type service.msc and hit enter. Here find Windows Installer Service. Double click on it to open its properties.
If this service is running, click on the stop button then again click on the Start button to start the service. If it’s not running then simply click on the Start button.

After trying one of the above methods feel free to rich us through comments if anything confuses you or let us know which method works for you and which did not.