Do you want to transfer photos and videos from your iOS device to Mac or PC? In this guide, you will learn to import photos or videos to your Mac or Windows PC.
Import to your Mac
Import to your PC
Import to your Mac
Steps to import photos or videos to a Mac are super easy as compare to a PC. Using these steps you can transfer from iPhone, iPad, or iPod touch to your Mac.
- Connect your iOS device to your Mac using a data cable and make sure it’s connected and show on your Mac.
- Now, open up the Photos app. Usually, the Photos app shows you an import screen to transfer selected or all the photos and videos from the connected device. If this doesn’t happen then you can manually click the device name in the sidebar or Photos app.
- When you select your device, this might ask you to unlock it, so enter the passcode. If you see any prompt to Trust This Computer then tap Trust and continue.
- Now, you need to select the photos and videos to import and then click Import Selected or click Import All New Photos.
It may take some time to import the stuff and it depends on the number of photos and videos. So, let it complete the transfer, and once done disconnect your device. In the future when you have new photos/videos then connect the device again and click the Import All New Photos button.
Import to Windows PC
You can transfer your pictures and videos from iPhone, iPad, or iPod touch to PC running Windows 10, 8, or even 7 without the help of any third-party software. If you are using Windows 10 then you will use the Photos app and If you are using an earlier Windows version the method is a bit different. Follow the given method below according to your Windows version.
Windows 10
To import photos to your PC, you need to connect your device with the computer and use the Windows Photos app.
- You must have the latest version of iTunes installed on your PC. iTunes 12.5.1 or later version is the requirement to import the photos to the PC.
- Use the data cable of your iPhone, iPad, or iPod touch and connect your device with the computer.
- If prompted then enter the passcode to unlock your iOS device and also when prompted and ask you to Trust This Computer, just tap Trust or Allow to continue.
- Open the Photos app, you can click the Start button to find it.
- To start importing photos and videos, click Import > From a connected device. Follow the on-screen instructions.
Windows 8 or Windows 7
If you can’t use the Photos app on Windows 8 or 7 then you can follow these steps to import photos and videos.
- Connect your iPhone using a data cable with your PC. If you are connecting your iPhone first time with a PC then Windows needs to install its driver. It will take some time so be patient.
- Once the device is installed correctly then your iPhone will be listed with other drivers under the Devices and drives section.
- So open your computer “The PC” and right-click on the iPhone device and then select “Import pictures and videos”.

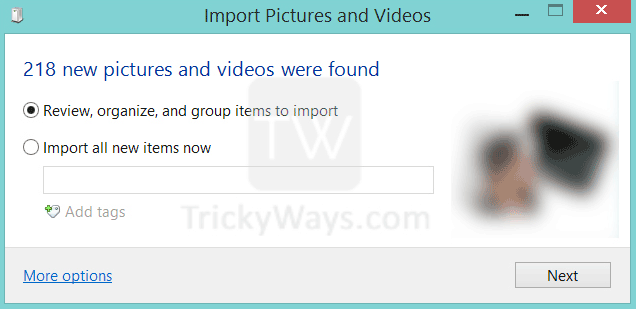
- This will open the import pictures and videos window, here you can see it showing a total number of pictures and videos found on your iPhone and some other option that you can choose to transfer pictures and videos.
- Select the “Review, organize, and group items to import” option if you are transferring or importing images the first time. The second option “Import all new items now” is useful when you have already transferred images from the device and want to transfer only new items from your iPhone.
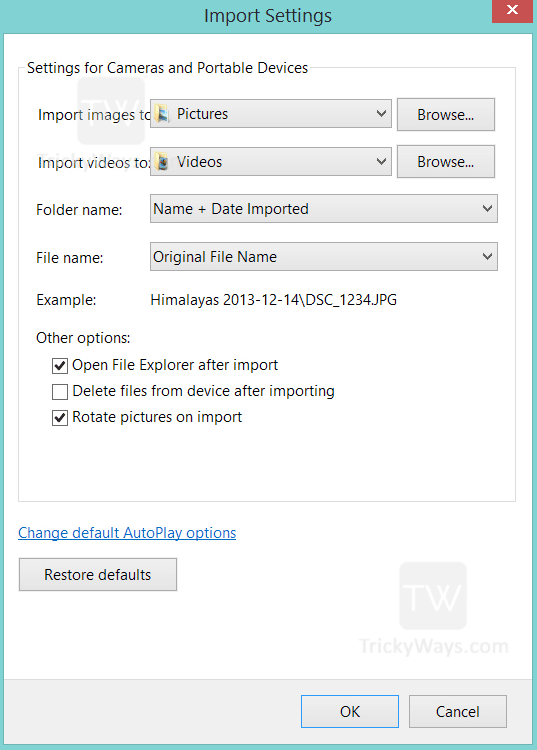
- Click on the “More Option” link to choose folders where you want to import iPhone pictures and videos. As you can see below you can set an import folder for Pictures, Videos, select folder, and file name, and some other options including “delete files from iPhone after importing”.
- So set all required options and click OK and then the Next button.
- In this step, select all or individual items to import. You will see all the pictures and videos are grouped by date and time. You can use the “Adjust groups” slider to change the amount of time between groups and a folder will be created for each group when you import. If you want to create only one group folder then move the slider to the most right side and then click import pictures.

When you click the Import button, it will take some time to transfer pictures from iPhone to PC according to the size and number of files.