Enable ad hoc network on Windows 8 PC and convert PC into a WiFi router. If you want to Share Internet Connection Windows 8 PC with other wireless devices then follow this guide to enable ad-hoc network on Windows 8. In Windows 7 you can create an ad-hoc connection easily but in Windows 8 this option is hidden and you need to run a few commands to share the internet.
Share Internet Connection from Windows 8 computer
Is Your PC Capable to Share Internet? First, you need to check if your Wireless Network card support hosted network or not? You can share internet connection only if your network card has the “Hosted network supported” option YES. Check whether your card does have this option or not.
This guide is divided into the following sections
- Check for the hardware support
- Share the internet with other devices
- Stop sharing internet
Is your hardware supported?
- Open the Command Prompt with administrator privilege, Right-click on the Start button or the left-bottom corner of the screen, and “select Command Prompt (Admin)” option from the menu.
- If you didn’t find this option here then Click on the left-bottom corner of the screen to open the Start screen and then click on downward-Arrow at the bottom to see all programs, Scroll and find Command Prompt, right-click on it and then click on Run as administrator option.
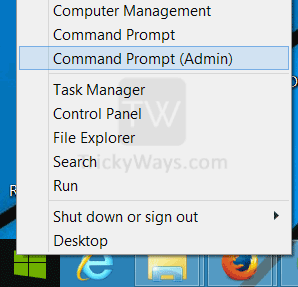
- Type the following command and hit enter.
netsh wlan show drivers - Now find the “Hosted network supported” entry in the command results If this setting is YES then you are good to go otherwise try to update your network card driver or upgrade your hardware.
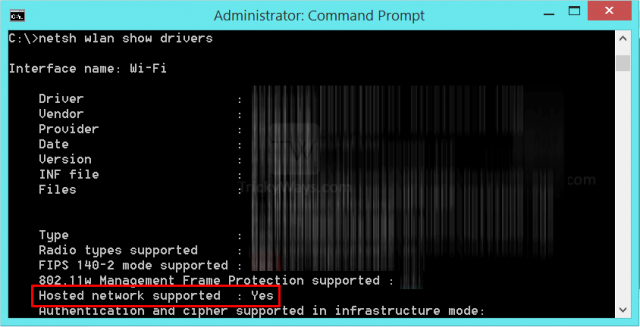
See also: Set up ad hoc network Windows 7
Start sharing the internet from your PC
Now set up the ad hoc wireless network means converting the PC into a Wireless router.
Create Ad-Hoc network command Windows 8
- Copy and paste the following command in the Command Prompt and hit Enter.
netsh wlan set hostednetwork mode=allow ssid=TrickyWays.com key=12345678
Where:TrickyWays.comis the network SSID and12345678is network password key (this key value should be 8 chars minimum). You can replace these two strings and write your own. - You will see the following output of the command is executed successfully.

- Till now we have created an ad-hoc network on Windows 8, it’s time to start it. Type the following command in the command prompt window and hit Enter.
netsh wlan start hostednetwork - You will see and message the Hosted Network Started.

- Now make sure the internet connection share option is enabled in your network connection properties. Right-click on the left-bottom corner of the screen and select the Network Connection option.
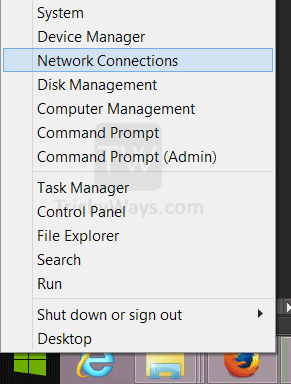
- Right-click on the connection icon and select Properties from the menu, this will connect the properties window.
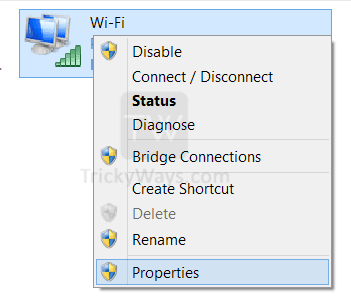
- Click on Sharing tab and then select the option “Allow other network users to connect through this computer’s internet connection”, also select ad-hoc connection from the “Home networking connection” drop-down. If you don’t want to allow the connected users to control your shared internet then un-check the last option. Click the OK button to save settings.
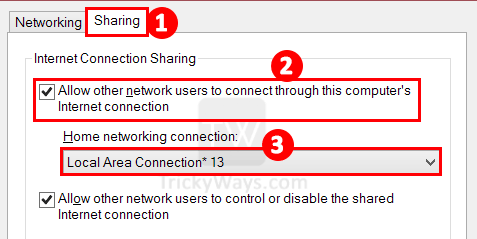
- Internet is shared now, try to connect to this shared connection from another device.
Stop sharing internet
If you no longer want to share the internet from your PC then execute this command from the Command Prompt.
netsh wlan stop hostednetwork
If you successfully share an internet connection from a PC or have any problem, share with us below in the comments.
how to set authentication (WEP, WPA, Open-none) on windows 8?