Computer with dual GPUs are common, the one that is the built-in graphics card that usually is Intel HD Graphics and the second dedicated graphics card may be from Nvidia or AMD. A laptop that has two GPUs are capable to run high-end 3D games and software that need hight performance. Usually whenever any app required more graphics processing that a built-in GPU can’t handle then it automatically switches to the dedicated graphics card. Due to some reason, you might want to force an app to use dedicated GPU, If this is the case then continue reading to know that.

You can set the preferred graphics card for the apps and games from the graphics control panels of the dedicated card. In the latest version of Windows 10, Windows introduced a new feature which allows you to set the preferred graphics card for performance and battery saving for Windows stores apps and also for the other desktop app. You can also add your own app to the list if it’s not showing there.
In my case, I have Core i5 6th generation laptop with Intel (R) HD Graphics 520 which is pretty good for normal and low-end gaming. My laptop also comes with a dedicated 2GB AMD Radeon (TM) R7 M340. This dedicated AMD Radeon is the powerful card as compared to Intel (R) HD Graphics 520 but every time I played a game or use apps such as PUBG and Adobe software, built-in graphics used instead of the dedicated graphic card.
Force an App or Games to use dedicated graphics card
Assigning dedication graphics card to an app can be achieved by following different methods and all are very simple. Just choose one that is more suitable in your situation.
- Add Apps in the Dedicated GPU List
- Customize Graphics Performance Preferences
- Disable Built-in Graphics
- Enable Gaming Mode in Windows
Method 1: Add app to Graphic Card preferences
To add apps or games to Graphic card preferences means you are telling your Graphics to use this app or game to highest performance.
- For AMD users: Open you AMD Radeon setting by right-clicking on empty space on your desktop and then select AMD Radeon Settings. Now click on System tab from the right corner and you will see the “Switchable Graphics” tab click on it.

- It will list down all the application which needs to use the graphic card but if your app or game not listed simply click on “Running applications” and select the “Installed Profiled Application”.

- Now click on the browse button and select your desired app or game. After that click on the recently added app and select the “High Performance” option and you are done.

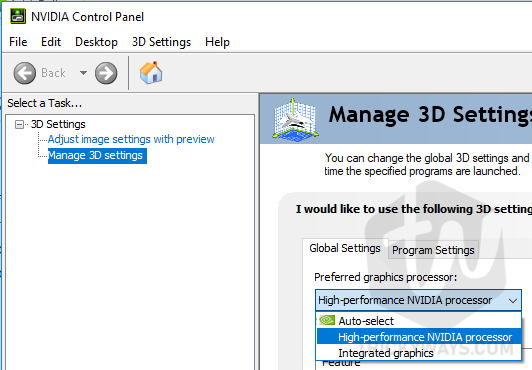
For Nvidia users, open Nvidia’s Control panel and click on Manage 3D settings. Here sect Preferred graphics processor to high-performance NVIDIA processor.

Method 2: Add App to Windows 10 Graphics Performance Preference
Windows 10 allows you to add any app or game to Graphics Performance Preference which means every time you run the app will use your computer hardware graphics as you set in graphics preference for an app.
Customize the graphics performance preference for specific apps. Preference may provide better app performance or save battery life. The choice may not take effect until the next time the app launches.
To add your game in Graphics Performance Preference, press Windows key from your keyboard, then type graphic settings to search for the settings and hit enter to open it.

Here on the Graphics settings window, click the Browse button (from the drop-down you can either choose a Classic app that you installed outside Microsoft App Store or Universal app that installed from the App Store)

Select the app from your computer (like I am selecting Tencent Gaming Buddy) and then hit Add button.

After adding, select the app that you just added and then click on the Options button. This will open up Graphics specification for that app. Here select High performance and click on save. As you can see below in the screenshot. The Power saving GPU is Intel HD Graphics 520 and the High-performance GPU is AMD Radeon M340. I need high performance for this gaming app so I choose Hight performance.

Now, every time I run this app on my computer, this will automatically use the high-performance GPU.
Method 3: Disable Built-in Graphics
You can also disable the built-in graphics adapter and force Windows to use a dedicated graphics card. This trick will work on all other Windows version including old Windows editions like Windows 8/8.1, Windows 7, etc. This will not harm your computer or Windows.
Note: if you disable built-in graphic card from you Windows then you can’t set the brightness, also your Windows sleep option will be gone. To get back these features you need to re-enable built-in graphics.
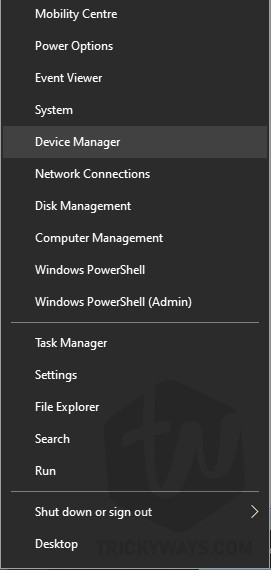
- Open Device Manager by right-clicking on start menu icon and then select Device Manager.

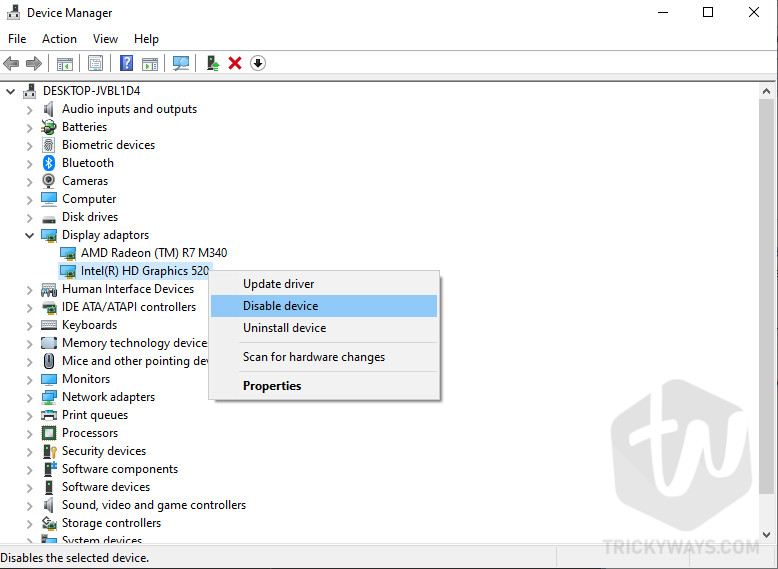
- Here expand the Display adaptors and then right-click on the Built-in Intel (R) HD Graphics 520 (you will be different) and then click on Disable device. Your Windows screen will go black for a second which means Windows is switching your Graphics card to dedicated card.

That’s it if you wish to re-enable your built-in graphics then repeat the above steps and click on enable device.
Method 4: Enable Windows Gaming Mode
Latest Windows 10 version like Windows 10 May update 2019 offers built-in gaming mode in settings, which helps you to optimize Windows 10 for gaming. This Windows 10 feature prevents system background processes such as Windows update, temporarily disables notification, etc. To enable this feature press “Windows+I” keys combination from keyboard. This will open up the Windows Settings. Here in the Settings click on Gaming option.
In the Gaming section, click on Game Mode from the left panel and then turn the “Game Mode” toggle button on.

Did you learn anything new today? Please share your experience of how you’re using dual GPU on your laptop. Did you ever use high performance GPU on the laptop battery? Tell use which dual GPU computer you are using including the brand name and specs.


