If you want to take screenshots of any movie or application with a specific time interval on Mac OS X then manually it is a little bit difficult task to manage. So, here we are writing a simple method which let you allow to take unlimited screenshots automatically and you may also set time interval between the screenshots according to your requirement.
See also:
Set a Folder to Save Screen Shots on Mac
Take Screen Shots on Mac with Keyboard Short Keys
Take ScreenShot Via Terminal On Mac
Set Timer To Take Screenshot On Mac Via Terminal
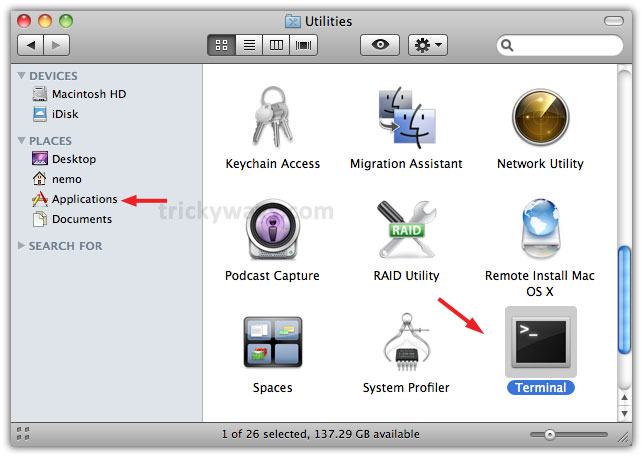
- Go to Finder

- Navigate to Applications > Utilities and launch Terminal

- Type the following command in Terminal and hit Enter
while [ 1 ];do vardate=$(date +%d\-%m\-%Y\_%H.%M.%S); screencapture -t jpg -x ~/Desktop/TrickyWays/$vardate.jpg; sleep 10; donewhere:
vardate = used to give the names to screenshots which will be the system date & time.
jpg = the format of screenshots.
Desktop/TrickyWays = folder to save the screenshot.
sleep = time interval between screenshots.
done = ends the while loop.

Press Ctrl+C to stop this loop
Or use the following command
i=1;while [ 1 ];do screencapture -t jpg -x ~/Desktop/TrickyWays/$i.jpg; let i++;sleep 6; done
where:
i = variable which is used to give the names to screenshots
jpg = the format of screenshots
Desktop/TrickyWays is the folder to save the screenshot
sleep = time interval between screenshots
done = ends the while loop
Press Ctrl+C to stop this loop


thanks for mac os x tips
Nice terminal tip to take screenshot on mac
How would you make this script work as a cronjob?
Is it possible to apply this command to a specific window on the screen? If yes, how? Thanks for your help!
Hey,
This is great. I’m curious if this is possible to edit so you can take screenshots of a very long website/browser window to see how the content changes over a longer time?
Any way to make this happen with more than one monitor?
cheers
in power mac g5, it doesnt work. how to take Automatic screenshot with date &time?
please help 🙁
Would you please tell me the OS X version installed on your Mac?
already installed os x 10.5.8 version on my mac. i think it’s the problem of power mac maybe..:(
Thanks for sharing this terminal snippet!
I made a menu bar application that adds a GUI to it
https://github.com/crilleengvall/Screenbar
this is old but… when I tried the command, it only takes pictures of my desktop background image–no matter what I’m doing.
I have 2 screen on my Mac, is it possible to choose the second screen to copy? Thank you.