You may need to transfer some files or folder from your Windows 7 PC to Windows 8 and here in this guide you will see how to use advanced password protected sharing option to share Windows 7 folder with Windows 8 / 8.1 easily. When you share a folder, all files and folders in this will be accessible to other users according to permissions. So I recommend, when you share something create a new folder, copy files and folders in it that you want to share. By creating a separate folder you will know that you shared this specific folder.
Requirements:
- Please make sure both your Windows 7 and 8 / 8.1 PC are connected with direct Ethernet cable OR using same network connection either LAN (Local area network) or Wireless / WiFi Router.
Snapshot of the guide:
- First we will turn on file sharing Windows 7
- Create a folder to share between Windows 7 and Windows 8 / 8.1, then add some files to it.
- Then we share this folder and set read write permissions.
- On Windows 8 PC we will access this Windows 7 PC folder, and also map a network drive to that folder so we can easily access it later.
See also: Share files between Windows 8 and Mac
Share Windows 7 Folder with Windows 8
Steps on Windows 7:
Turn on Password Protected Advance sharing:
Click on Start button, type Advanced sharing in the search box and click on Managed advanced sharing settings in search results.

In the advanced sharing settings window select the following options.
Under your current profile choose Turn on file and printer sharing option and scroll-down a bit to select Turn on password protected sharing option.

Create a new folder and put some files in it that you want to share, Right-click on this folder and click on Properties.

Click on Sharing tab and then click on Advanced Sharing... button, this may ask for administrator password so give it.

Advance sharing options:
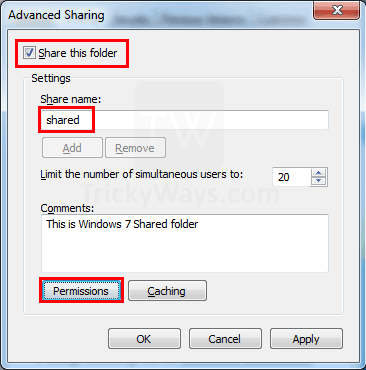
Select the Share this folder check-box to enable sharing.
Give a proper name to the shared folder. I recommend you to give a short and proper name without spaces and special characters (like: shared).
You can limit the number of users to access this folder simultaneously, set this option if its critical for you.
Write some comments so you can remember purpose of this folder sharing.
Click on Permission button to modify folder permissions, by default folder is set to read only.
Permissions settings for folder:
Here set folder permissions by selecting the check-box in front of options: Full control, Change or Read only. I select Full Control check-box because i want to give Read, Write access.
Click OK button to save permissions and OK again to save Advanced Sharing options.

On the folder Properties window, here you will notice a network path is assigned to Windows 7 folder that you just shared. Note this down exactly and click the OK button.

Steps on Windows 8:
You can access this shared folder either by typing network path in Run window or map a network drive to access it later.
Open Run window by pressing Windows+R keys from keyboard.
Type the network path of folder that you noted down in last step and hit the enter key.

This will ask for network credentials. To access the network folder enter the username and password of Windows 7 user and hit the Enter. This may take some time to connect to the other PC, be patient.

Finally you will see the content of shared Windows 7 folder in Windows 8.

If you want to create a drive for this Windows 7 network folder so you can access it later easily, here is how!
Click and drag the path icon to The PC as shown below. This will open a Map Network Drive window, here choose a drive letter and click Finish button to save it.

You will notice a new drive icon of mapped network folder is created and you can open it to access shared files and folder of Windows 7.

Tell us If you successfully share your files and folder below in comments or you can ask any question, Thanks.