If you have installed Apple’s latest OS X Mavericks on your Mac and on the other side have a PC running Microsoft Windows 8.1 operating system, and now want to share OS X Mavericks files with Windows 8.1 then you are at the right place to find the help. Here we’ve compiled step by step instructions that can enable file sharing between OS X Mavericks and Windows 8.1. So, continue after the break to get access to the whole article to build a connection between computer running OS X Mavericks and a PC running Windows 8.1 to share files.
See also: How to Remotely Access Mac from PC
Requirements
- Make sure both your Mac and PC are on same Wireless or LAN network.
- This guide is written for Windows 8 and OS X Mavericks 10.9.
Let’s talk about the steps to enable file sharing between PC (Windows 8.1) and Mac (OS X Mavericks)…
Enable File Sharing Between OS X Mavericks and Windows 8.1
Note: Steps are same for both Windows 8.1 and Windows 8.
First do the following steps on Mac OS X Mavericks. Create a new user for file sharing purpose.
Step-1
Press cmd+space keys from keyboard and type users & Groups in Spotlight

-OR-
Click on Apple menu and select System Preference > Sharing icon.
Select “Users & Groups” in search results.
Step-2
Click on this lock icon, enter admin password.
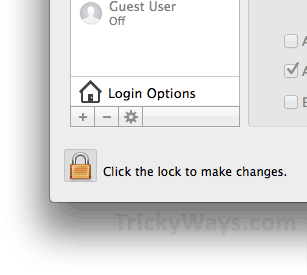
Step-3
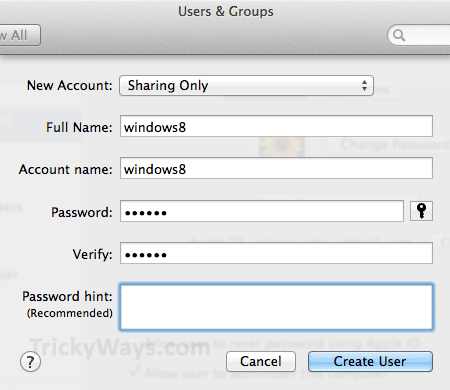
Click on + sign to add a new user.

Fill the form with the details as shown below then click Create User button.
Setup file sharing
Step-4
Now we are going to enable file sharing option in OS X Mavericks so we can access folders from Windows 8.1.
Press cmd+space keys from keyboard and type file sharing in Spotlight

-OR-
Click on Apple menu and select System Preference > Sharing icon.
Select “File Sharing” in results
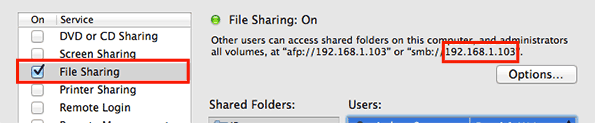
Step-5
On sharing window select the File Sharing check-box, an IP address will be assigned. Note down this IP address.
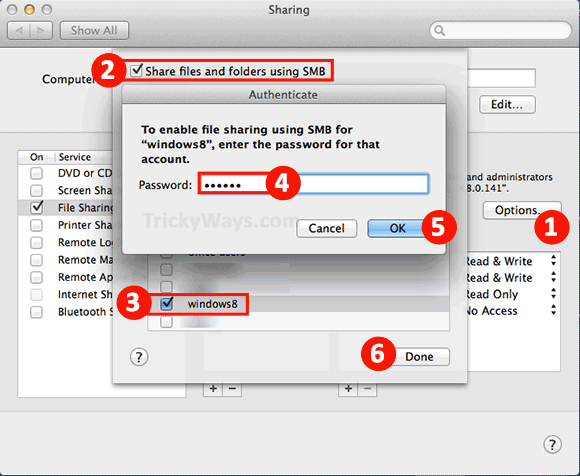
Step-6
Click on Options... button, click on Share file using SMB check-box and then select username (that created in first steps), enter user password and click OK and Done buttons.
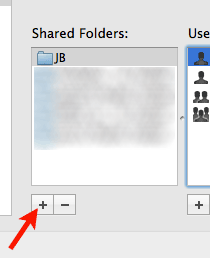
Step-7
Click on “+” icon under “Shared folders” section and select a OS X folder that you want to share with Windows 8.1.
Note: You should remove all unwanted folders from this sharing list, because all folders that are listed in this section will be available to user on PC after sharing.
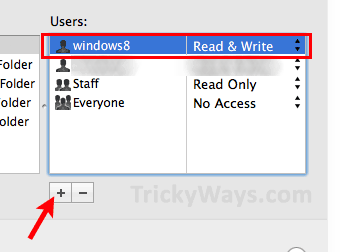
Step-8
Click on + icon under Users section and select the user windows8 that we have created in first steps. After selecting user, set folder permissions for the user to Read & Write as shown below.
All done on Mac, now close this window and go to your PC.
Steps on Windows 8.1
Following steps you need to do on Windows 8 to access OS X shared files.
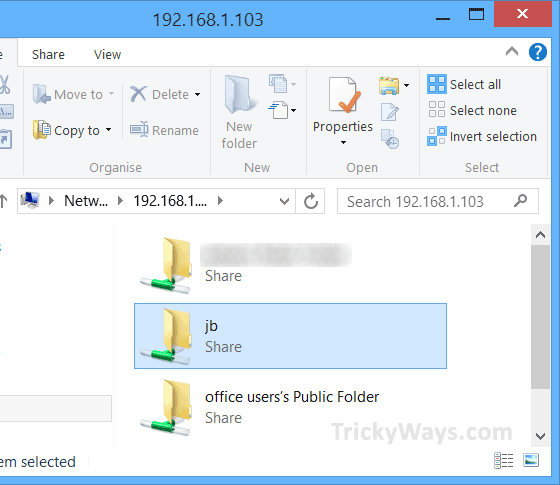
Press Windows+R keys from keyboard and type the IP address of your Mac that your note down in step-5 and hit enter.

Windows will ask for the username and password Type the username and password that we have created in step-3.
After entering correct username and password your will see the folders that you have share with Windows.
After completing the file sharing purpose, remember to disable sharing especially when shared with any other person. That’s it! You have successfully shared files between OS X Mavericks and Windows 8.1.
Don’t forget to share your experience in the comments section below.
I have followed your steps, but while at the win8 and entering file path and hitting enter it does not come up with the box asking for username and password – it only seem to spend a long time time tying to open up the connection to the Mac and than eventually fails.
Any suggestions how to fix this?
thanks
Please, Confirm your Mac computer IP address in Step-5 and make sure in step-8 you are putting “\\” backslashes before the correct IP address. Also check your Mac an PC are on same network. Try to restart your PC and try again to access your Mac. If still facing problem please reply.
Note that your mac will show the addresses with forward slashes, but on the windows machine you’ll need to use back slashes or you will get the error, “Windows cannot find…” This is shown correctly in the screenshot above, but it’s an easy thing to overlook.
In the Windows run prompt,
enter \\192.168.1.103
not //192.168.1.103
(use your actual ip address, of course)
I have the same issue as the above user(Olav) the windows machine connects to the shared drive but then will not open the drive it just times out and Hangs window explorer any thoughts?
Thank you so much! I had been trying to do this for a couple of days before I found your steps (I used wrong keywords in Google and ended up messing up my sharing network).
this does not allow a permanent network connection to be established. It would be very helpful to provide the how-to for this too. Thanks
Thank you!
man.
You’re welcome, If you want more How-to guides like this about Mac and latest OS X versions please follow us on Facebook or Twitter or just subscribe to the email service.
Thanks a lot, its transfering some files but too slow, 15 minutes and 2% out of 25gb, what can I do??? thanks again!!!!
Transferring data using wireless or cable network is always slow unless you have better Gigabit devices. Are you transferring over Wifi? You can get bit better file transferring speed when you connected both Mac and PC through cable.
What am I supposed to type in the Windows Run box if my Mac says my address is “afp://jayslaptop” or “smb://jayslaptop” instead of an IP address?
Don’t worry you can access Mac computer by name, just type \\jayslaptop. If you need more help just reply.
I followed the directions, and poof, my little toshiba netbook and can now wirelessly save to the 3 tb external drive i have attached to our new Mac Mini. Thank you so much!
You are a wonderful teacher… You left nothing out and your directions were perfect!!
Thank you so much for helping me get this connection done.
Dennis
Whenever I try to save a file on my Mac that I’ve opened remotely on my PC it says “The document could not be saved. The file may be read-only, or another user may have it open. Please save the document with a different name or in a different folder.”
Then if I do save the file as a different name, I get the message on my Mac, “You do no have permission to open the document ‘XYZ.doc.’ Contact your computer or network administrator for assistance.”
See the step8 above in guide, Make sure you have added correct user and set permission to Read & Write.
This was a breeze – thank you so much – a million times clearer than lots of other forums etc out there.
From all the articles I read abut solving this, I found yours the most useful. Now I am able to transfer the files from my Win to Mac.
So I did all this, established a good read/write connection both ways (from mac to pc, and from pc to mac). All good… till the next day. After shutting down computers and starting again the next day, cannot get read/write access either way, only read. All sharing and permissions double checked. Still set up per above, so what’s going wrong? Any ideas what I can look at further to establish a reliable connection between mac and pc that we’re not going to have to fiddle with each day.
I have roommates living with me and i want to share my files. I have it set so they only should have read only access, but when i use their computer, they are able to copy files to the folder, move things around, and permanently delete thiings!!!
how do i fix this huge problem!!!!
Please revise your step-3 and make sure user is for “sharing only” purpose and after that check in step-8 you selected that sharing only user and set the rights to “read only”. Also on Windows when you access Mac using IP, make sure you enter the same username and password that created for sharing purpose. Reply if you still need help.
I am preparing to pass the Mac onto my son and want to get all the media files from it to the PC. There are over 15,000 files and your method worked for about 12,000. I am left with 3,000 files for which WIndows8 lacks clearance and cannot move or copy them. Is there a way to either change the properties of all those files together rather than one at a time, or to push them from the Mac end to the PC (rather than to pull them from the Mac to the PC)?
Thanks
What happened after transferring 12000 files? did you get any message or what? check this guide as well http://www.trickyways.com/2011/08/access-pc-windows-7-files-from-mac-os-x-lion/
Seems the problem was also physical with the I/O system of either my USB port or my external HDD. It was sometimes on and sometimes off. I had so many variables at the time in an unfamiliar environment I just kept looking for other ways. Eventually did a 2-step via the cloud.
Must diagnose that I/O thing before I need it again. Thanks for intererst.
Do you have directions on how to do this the other way. I want to share files on a Windows 8.1 system to a MAC with Yosemite.